Crochet Easy Large Granny Bag: A Step-by-Step Guide
Crocheting a large granny bag is a fun and rewarding project, perfect for beginners and experienced crocheters alike. This stylish and practical bag is created using basic granny squares, making it a great way to practice or showcase your crochet skills. In this guide, we’ll walk you through the materials needed, step-by-step instructions, and tips for making your granny bag unique and functional.
Materials Needed:
- Yarn: Medium-weight (worsted) yarn in your chosen colors
- Hook: Size H (5.0 mm) crochet hook
- Scissors
- Yarn needle
- Lining fabric (optional)
- Sewing needle and thread (optional)
- Handles (optional, leather or crocheted)
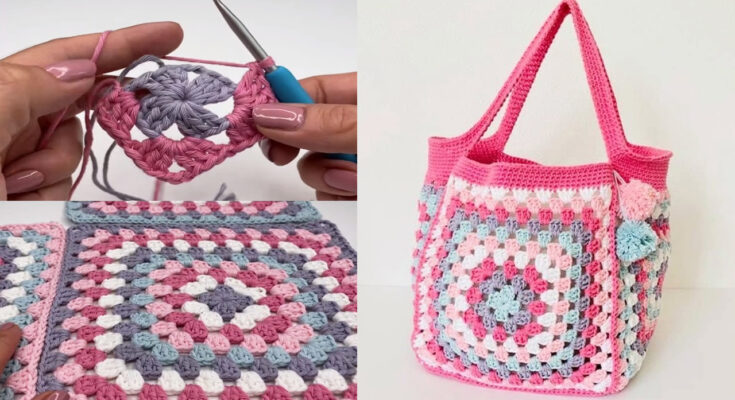
Step 1: Make Granny Squares
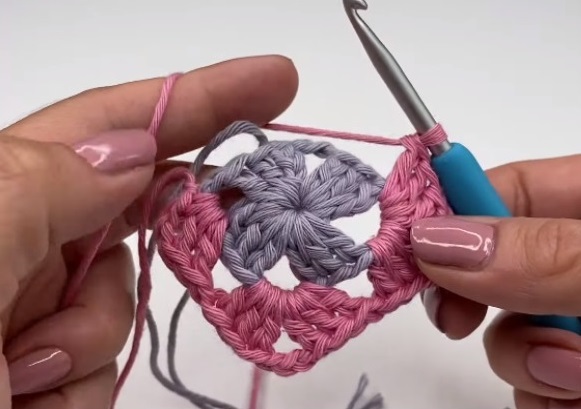
- Start with a magic ring (or chain 4 and join with a slip stitch to form a ring).
- Round 1: Chain 3 (counts as first double crochet), work 2 double crochets into the ring, chain 2. [3 double crochets, chain 2] repeat three more times. Join with a slip stitch to the top of the beginning chain.
- Round 2: Slip stitch into the next two stitches and into the chain-2 space. Chain 3, work 2 double crochets in the same space, chain 2, work 3 double crochets in the same space (corner made). 3 double crochets in next chain space, chain 2, 3 double crochets in same space repeat around. Join with a slip stitch.
- Continue expanding the granny square by repeating the pattern, adding 3 double crochets in each space between groups, and always placing [3 dc, ch 2, 3 dc] in each corner.
- Make multiple squares until you reach the desired bag size (typically 10–12 squares for a large bag).
Step 2: Assemble the Bag
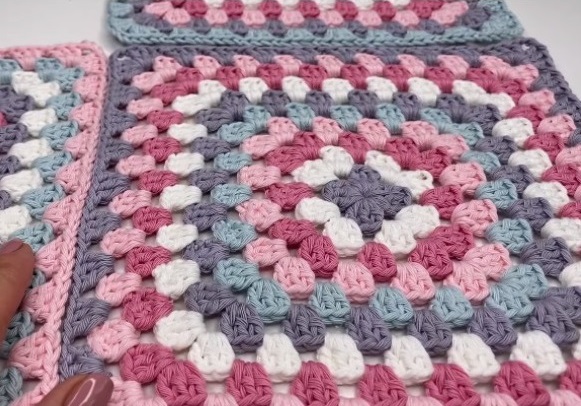
- Lay out your squares in the desired arrangement.
- Join the squares using a slip stitch or whipstitch, working through the back loops for a seamless look.
- Form the bag shape by folding and sewing the squares into a tote structure.
Step 3: Add Handles and Finishing Touches
- Handles: Crochet sturdy straps by making a chain (about 24 inches long) and working several rows of single crochet. Alternatively, attach pre-made handles.
- Lining (Optional): Cut fabric to the bag’s shape and hand-sew or machine-stitch it inside for extra durability.
- Edging: Add a final round of single crochet around the opening for a polished look.
Step-by-Step Breakdown for a Large Granny Bag
Step 1: Choosing Your Yarn & Hook
- Best Yarn Types: Worsted-weight (size 4) or chunky yarn works well. Cotton yarn is great for durability, while acrylic gives a softer feel.
- Recommended Hook Size: A 5.0mm (H) or 6.0mm (J) crochet hook, depending on the yarn thickness.
Step 2: Making the Granny Squares
Each granny square forms part of the bag, and you can customize its size based on how large you want the bag.
Basic Granny Square Pattern:
- Start with a magic ring (or chain 4 and slip stitch to form a loop).
- Round 1:
- Chain 3 (counts as the first double crochet).
- Work 2 double crochets into the ring.
- Chain 2, work 3 double crochets — repeat this pattern three more times.
- Join with a slip stitch into the first chain-3.
- Round 2 and Beyond:
- Slip stitch to the next chain space.
- [3 dc, ch 2, 3 dc] in each corner to maintain the shape.
- 3 dc in each side space.
- Repeat for 4–6 rounds until your square reaches the desired size.
- Make multiple squares (about 10–12 for a large bag).
Tip: Use color changes every few rounds to create a striped or gradient effect!
Step 3: Assembling the Bag
- Lay out your squares in a rectangular shape (e.g., 3×2 on each side).
- Join the squares: Use one of these methods:
- Slip Stitch Join – Insert the hook through the loops of two squares and slip stitch across.
- Whipstitch Join – Use a yarn needle to sew the edges together.
- Flat Braid Join – A decorative option using chain loops.
- Shape the Bag: Fold the joined squares into a tote bag shape. Sew or crochet the sides closed, leaving the top open.
Step 4: Adding Handles & Finishing Touches
- Handles:
- Crocheted Straps: Chain 80–100 stitches and work 3–4 rows of single crochet for strength.
- Leather or Wooden Handles: Attach them with metal rings for a professional look.
- Edging: Work a round of single crochet around the bag opening for a clean finish.
- Optional Lining: Sew fabric inside for durability.
Extra Design Ideas
- Tassels or Pom-Poms for a playful touch.
- Zipper or Button Closure for security.
- Mix & Match Granny Squares (solid, flower, or lace patterns).

Final Thoughts
Your easy large granny bag is now complete! Experiment with different color combinations, embellishments, or even add a zipper for more functionality. This bag is perfect for daily use, shopping trips, or as a unique handmade gift.
Happy crocheting!
Video tutorial:


