
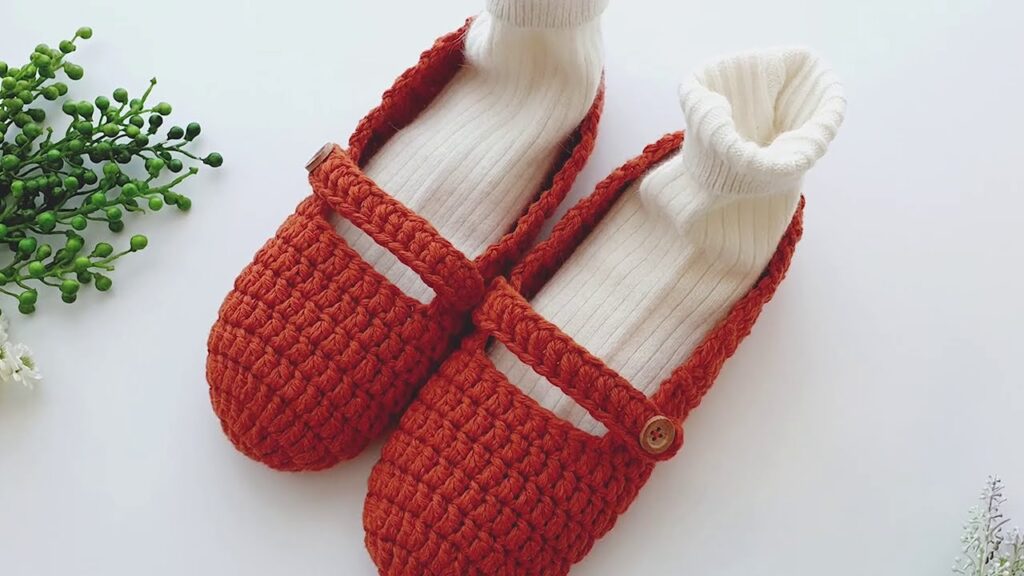
The perfect slipper should be warm, comfortable, and stylish enough to make you feel chic even when relaxing at home. This pattern, inspired by the beautiful design from Adel Crochet, delivers on all counts. We’ll be creating a charming Mary Jane-style room shoe using a thick yarn for extra warmth and a clever heel technique for a snug fit.
This is a great intermediate project, utilizing simple stitches but introducing key shaping and seaming techniques to create a truly professional-looking slipper.

🧶 Materials & Sizing Notes
| Item | Details |
| Yarn | 2 skeins of Fine Lamb’s Wool (or any similar DK/Light Worsted weight wool blend). The video recommends holding two strands of yarn together throughout the project for thickness. |
| Hook | 8.0 mm (US L-11 equivalent) crochet hook. |
| Notions | Stitch markers, tapestry needle for weaving ends and seaming, one decorative button for each slipper. |
Sizing and Gauge
The size of the slipper is primarily determined by the number of stitches in your starting round (Round 1). The pattern below uses the size demonstrated in the video (a women’s size medium).
| Sizing Adjustment | Starting Stitches (Round 1) | Effect |
| Standard (Approx. US 7-9) | 9 DC Stitches | Follow the pattern exactly. |
| Smaller | 7 or 8 DC Stitches | Creates a narrower foot base. |
| Larger | 10 or 11 DC Stitches | Creates a wider foot base. |
Note: The primary stitch used in the original video translates to Double Crochet (DC) in US terms. We will use US Double Crochet (DC) throughout this pattern.

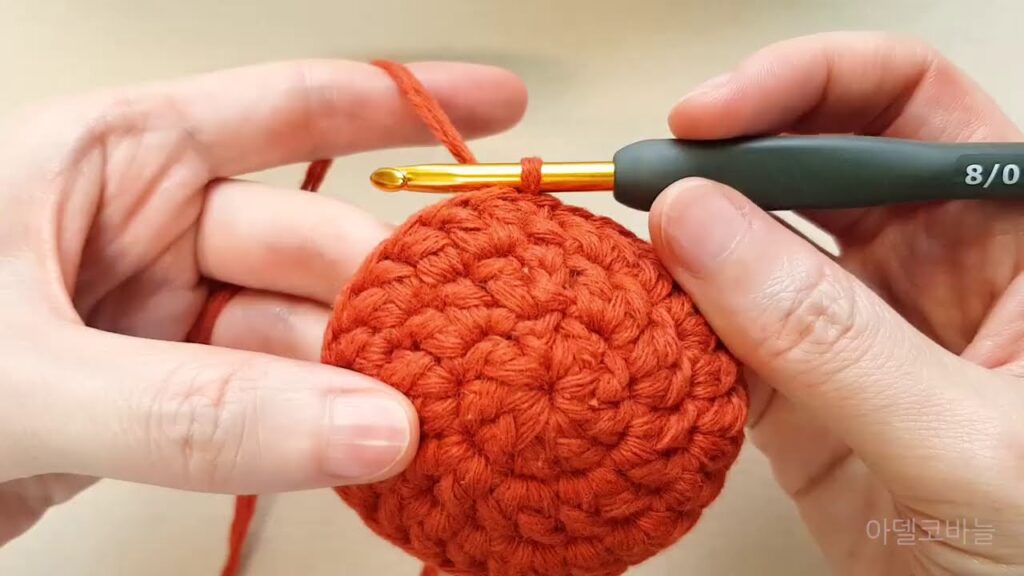
👣 Part 1: The Toecap & Foot Base (The Foundation)
We start at the toe and work our way up the foot, increasing stitches to create a gentle, rounded shape.
Stitch Guide:
- Ch: Chain
- Sl St: Slip Stitch
- DC: Double Crochet
- Ch 2: Turning chain (counts as the first DC)
Foundation: Create a Magic Loop (Magic Ring).
Round 1: Initial Stitches
- Ch 2 (counts as 1 DC).
- Work 8 DC into the Magic Loop. (Total 9 stitches).
- Pull the tail tight to close the loop.
- Join with a Sl St into the 2nd chain of the starting Ch 2.
Round 2: Wide Increase
- Ch 2 (counts as 1 DC). Place a stitch marker in the 2nd chain—this is where you will join.
- Work 1 DC into the same starting stitch. (This creates 2 DC in the first stitch).
- Work 2 DC into every stitch around. (Total 18 stitches).
- Join with a Sl St into the marked chain.
Round 3: Shaping Increase
- Ch 2 (counts as 1 DC).
- Work 1 DC into the next stitch.
- [Increase Repeat]: Work 2 DC into the next stitch, then 1 DC into the following stitch.
- Repeat the [Increase Repeat] sequence all the way around. (Total 27 stitches).
- Join with a Sl St into the 2nd chain of the starting Ch 2.
🦶 Part 2: Building the Foot (The Body)
Now that the toe is shaped, we work straight rows (no increases) to create the length of the slipper that covers the top of your foot.
Rounds 4–8 (or desired length):
- Ch 2 (counts as 1 DC).
- Work 1 DC into every stitch around. (Total 27 stitches).
- Join with a Sl St into the 2nd chain of the starting Ch 2.
- Repeat this process for a total of 5 straight rounds after your last increase round, or until the slipper covers your foot to where the ankle begins.
Finished: Fasten off and weave in the starting end. The slipper should look like a small tube at this point.
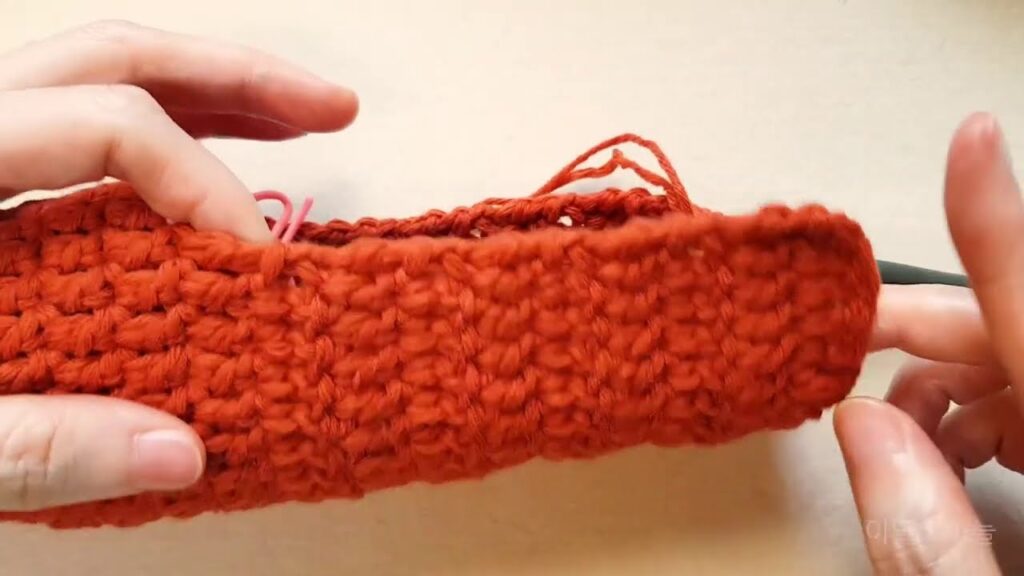
📐 Part 3: Creating the Heel & Sides (Working Flat)
We now create an opening for the ankle and start working rows flat (back and forth) to build up the side and heel piece.
- Marking the Opening:
- Lay the slipper flat, ensuring the Sl St join line (the seam) is at the center bottom (this will be the sole).
- Count 7 stitches back from the center front of the slipper and place a marker.
- Count 7 stitches forward from that center front and place a second marker.
- The stitches between the markers will be left open for the ankle.
- Starting Row 1 (Working Flat):
- Attach your yarn with a Sl St into the stitch immediately before your first marker.
- Ch 2 (counts as 1 DC).
- DC into the same stitch and in every stitch until you reach the stitch immediately before your second marker. (You should now have 20 DC stitches in your row).
Rows 2–10 (The Straight Sides):
- Ch 2 (counts as 1 DC).
- Turn your work.
- DC into the next stitch and in every stitch across the row. (Total 20 DC stitches).
- Repeat this process until you have completed 10 rows or until the side piece wraps around your heel, leaving about 2 rows of space before the sides meet at the center back.
- Do not fasten off.
✂️ Part 4: The Heel Turn (Shaping the Back)
The last two rows gently shape the heel to make it curve and hug your foot.
Row 11: Single Crochet Decreases for Heel Shaping
- Ch 2 (counts as 1 DC).
- Turn your work.
- DC into the next 8 stitches. (Total 9 stitches, including Ch 2).
- Decrease 1: SC 2 Together (SC2TOG) over the next two stitches.
- Decrease 2: SC 2 Together (SC2TOG) over the next two stitches.
- DC into the remaining 8 stitches and into the top of the turning chain. (Total 18 stitches).
Row 12: Single Crochet Center
- Ch 2 (counts as 1 DC).
- Turn your work.
- DC into the next 7 stitches. (Total 8 stitches, including Ch 2).
- Short Stitches: Work 1 SC into the next 4 stitches (these are the stitches over the decreased area).
- DC into the remaining 7 stitches and into the top of the turning chain. (Total 18 stitches).
Finished: Cut your yarn, leaving a long tail (at least 15 inches) for seaming the heel.
🧵 Part 5: Finishing & The Mary Jane Strap
Heel Seaming
- Turn the slipper inside out so the right sides are facing each other.
- Thread the long tail onto a tapestry needle.
- Starting at the top edge, use a whipstitch or mattress stitch (the video uses a neat invisible seam by catching only the inner loop of each side) to sew the back opening shut.
- Weave in the remaining tail and turn the slipper right side out. The heel should now be a neat, curved cup.
Crocheting the Strap
We will now create the Mary Jane strap.
- Start with a slip knot.
- Chain: Ch 16 (or more/less, depending on desired length).
- Turning Chain: Ch 2 (counts as 1 DC).
- Working Back: Starting in the 4th chain from the hook, work 1 DC into the back bump (or “back mountain”) of each chain across.
- You should have a total of 16 DC stitches.
- Finishing Loop: Ch 2. Sl St into the last stitch to create a small, circular loop for the button.
- Fasten off, leaving a long tail for attaching the strap to the slipper.

Attaching the Strap
- Using the long tail and tapestry needle, position the strap just in front of the ankle opening (on the outside of the foot).
- Securely sew the end of the strap to the side of the slipper.
- On the opposite side of the slipper (the inside of the foot), sew your decorative button in place so that the strap’s loop fits securely over the button.
Repeat all steps for the second slipper, ensuring you mirror the strap placement (it should be on the outer side of each foot).
Video tutorial:


